Recording & video calls

How to read a script while looking at the camera on Mac

Put your script close to the camera you are using, keep the text column narrow, and let it scroll at your speaking pace. This Mac setup helps you read talking points with fewer glances down at your screen.

Free on the Mac App Store · macOS 14+

By Sardorbek Rakhimov

How do I read a script and look at the camera?

Open your script in a floating teleprompter and position it just below or beside your webcam. Increase the text size until you can read comfortably, use short lines, and match auto-scroll to your voice. Record a short test: if your eyes visibly move from side to side, narrow the text column or shorten the lines.

In Lucid Notes, select a note and choose Note → Open in Teleprompter. You can also use the toolbar’s play icon. On a MacBook, the Pin to notch area control places the script near the built-in camera. For an external webcam, position the regular prompter beside that camera instead. Placement reduces the distance your eyes travel; it does not guarantee perfect eye contact.

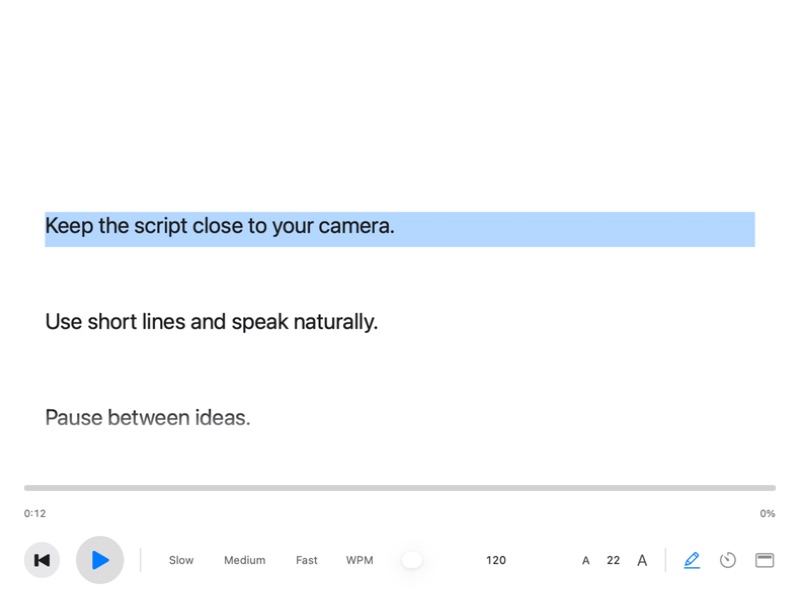
Lucid Notes teleprompter showing highlighted script text, play controls, speed presets, a WPM slider, and text-size controls
A practice script in Lucid Notes 2.2.0 on macOS 26.5.2. The bottom bar contains Play, speed presets, WPM, text size, highlighting, and Pin to notch area.

Set up your script on a Mac

Prepare and open the note

Write or paste your script into Lucid Notes. Use one idea per paragraph and short lines. Finish editing, select the note, then choose Note → Open in Teleprompter, or click the toolbar’s play icon. If you edit the original note later, reopen the teleprompter to load the revised text.

Place the script beside the camera you use

Move the regular prompter just below or beside your webcam. If you use the MacBook’s built-in camera, try Pin to notch area. If your camera is on a separate monitor, keep the script on that monitor near the camera, rather than beside the laptop camera.

Adjust line width and text size

Start with short lines that you can read without sweeping your eyes across the screen. Increase text size until it is comfortable at your normal sitting distance. Keep the video-call window nearby so you can still notice the other person’s reactions.

Set the speed by reading aloud

Use a speed preset or the WPM slider, press Play, and read one paragraph aloud. Slow down if the text runs ahead of you. Leave space between ideas for pauses instead of trying to speak faster to catch up.

Record and watch a short test

Record about 15 seconds with your actual camera and recording app. Check your eye movement, text placement, and pacing. For a screen share, preview exactly what the audience will see before starting; an ordinary floating prompter can appear in a full-screen share.

Use prompts for a conversation, a script for a recording

For a live meeting or interview, a few short prompts can be easier to use than a paragraph you need to recite. Write names, numbers, questions, and key points, then return your attention to the conversation.

For a prepared video, a full script can help. Write it as you speak, with short sentences and clear pauses. A teleprompter controls where the words appear; rehearsal is still what makes the delivery sound natural.

Built-in camera, external webcam, or hardware teleprompter?

For a MacBook camera, the notch area keeps the text near the top center of the display. With an external webcam, arrange the prompter around that webcam instead. Text on the wrong display still makes you look away, even if it is close to the laptop’s camera.

A hardware teleprompter uses reflective glass to place the script directly in front of the camera lens. A software window sits near the camera rather than on its optical axis. For Mac-based calls and recordings, try the software setup and review a test before deciding whether you need extra equipment.

Keep your script out of the screen share

A webcam-only call does not transmit your desktop. Once you share your screen, the selected screen or window determines what others can see. Share only the presentation or app window when you want your regular prompter to remain outside the share.

Check a preview or a short recording with the exact app and macOS version you will use. Do not treat a floating window, transparency, or placement near the notch as proof that your script is invisible to the audience.

Free to start on the Mac App Store

Keep your script near your camera.

Try Lucid Notes with your next practice recording. The free tier includes 3 teleprompter sessions per month.

Get Lucid Notes Free

Frequently asked questions

Can people tell I am reading from a teleprompter?

They may notice eye movement or a rehearsed delivery. Keep the text close to your camera, shorten the lines, and watch a test recording. For conversations, brief prompts often work better than reading every word.

Does this work with an external webcam?

Yes. Position the regular teleprompter beside the external webcam. Pinning text to the MacBook notch is useful for the built-in camera, but it will not help if you are looking at a camera on a different display.

Where is Open in Teleprompter?

Select a note, then choose Note → Open in Teleprompter. The toolbar also has a play icon with that tooltip. If the toolbar button is hidden, check Settings → General → Teleprompter Button. The default shortcut is ⌘⇧T; customized shortcuts may differ.

What scroll speed should I use?

Start at a comfortable speed, read a paragraph aloud, and adjust the WPM slider to match your delivery. Allow for pauses. The right setting depends on your script and pace, so use a recording test rather than a fixed number.

Is Lucid Notes’ teleprompter free?

The free tier includes 3 teleprompter sessions per calendar month and up to 5 notes. Pro removes the teleprompter session limit. Lucid Notes requires macOS 14 (Sonoma) or later.